You don't the permission to view this video
In this first segment of our 3-part home weatherization series, we’re going to focus on areas of the house most prone to air infiltration. We’re going to carefully examine the perimeter of our home to look for spots where air might be getting in. Then we’re going to focus on properly sealing these gaps.
Preparing your home for winter by sealing the cracks and gaps in your home’s exterior is one of the best things you can do to save money on utility bills throughout the year. It will also make your home more comfortable for you and your family. While there are many facets to making your home more energy efficient, the best place to start is by carefully examining your home’s exterior to seek out and fill all the areas where cold air is getting in, including around windows, doors and other places where pipes or exhaust ducts penetrate your home.
In this first segment of our 3-part home weatherization series, we’re going to focus on areas of the house most prone to air infiltration. We’re going to carefully examine the perimeter of our home to look for spots where air might be getting in. Then we’re going to focus on properly sealing these gaps. So let’s get started.
According to the U.S. Department of Energy, if you add up the total size of all the small cracks and gaps in the average American home, it’s equivalent to the size of this open window. Imagine leaving a window in your home open all winter long and how much that would add to your seasonal heating costs? But that’s essentially what you’re doing when you neglect sealing all the gaps in your home’s exterior. The good news is that it’s easy to do yourself, with products and advice from your local independent home improvement retailer.
The first step to stopping outside air from infiltrating your home is taking a walk around your home to focus on all the various pipes, ducts and cables entering your home’s envelop, which is the portion of the structure that you heat and cool. Here we find one of the common culprits ... the air conditioner lines entering the home through the brick siding. Notice how the sealant has shrunk and cracked. That’s not stopping any air from getting in ... or bugs either. To fix this, we’ll use expanding spray foam sealant specifically designed for this purpose. Simply spray the foam into the gap. Notice how it expands to fill all voids in the hole. The type we’re using is a low-expansion latex-based, multi-purpose sealant designed for filling cracks.
When using any expanding foam sealant, just be sure to wear safety goggles and gloves, as it will stick to your hands, clothing and anything else it touches. For more information on expanding foam sealant, see our frequently asked questions for this video.
Now we’ll examine another common place where outside air infiltrates your home. It’s your windows. Leaky old windows like this one don’t provide much of a barrier for stopping cold air from entering the home. Even new windows can use some caulking to help seal the gaps between the window and the trim. If we’re still worried about air getting through, we can pop off the casing and spray some minimally expanding spray foam sealant around the perimeter of the window between the jamb and the framing. When finished, we’ll simply reinstall the casing. You may also want to check your outlets and light switch boxes for gaps and seal them, too. After filling any gaps, simply trim away the excess. This flush cut saw will do the job nicely.
What this window needs is some shrink film to seal it off. Shrink film is easy to install. Simply cut the size sheet you need. Place the 2-sided tape around the perimeter of the window, and stick the plastic sheeting to the tape. Then, with a blow hair dryer on the hot setting, blow warm air onto the plastic until it shrinks and pulls tight. This will form a tight seal around the window which will help keep cold air out this winter.
From windows we move to doors. Unless your doors are relatively new, they probably have some gaps that need attention. Why? Because continuous opening and closing (and slamming) can jar the door frame, which can eventually lead to gaps over time, like you see here. Even though this door is completely shut, it’s far from being sealed. You can tell by the light penetration, which means air is getting in. This door has the same problem. To fix it, we’ll use this weather seal tape. Weather seal tape comes in several different styles and thicknesses to fill various gap sizes. To apply it, we’ll start at the corner and press the adhesive side of the tape onto the flange where the door seats when it closes, removing the backing as we go. First one side of the jamb, then the top, then the other. Now we’ll close the door to make sure we have a tight seal. That looks pretty good.
We also need to check the threshold to make sure there aren’t any gaps at the bottom of the door. This one looks pretty good. This type of threshold has a rubber bulb that fits into this channel and seals the bottom of the door. However, under heavy foot traffic, they wear out over time and need to be replaced. If your threshold is badly worn, like this one, it’s time to replace it. There are many products designed to seal the gaps under doors, including door sweeps. Check with your local independent home improvement retailer for window, door and insulation products that are right for you.
Oh! One last thing. Sometimes voids in exterior wall insulation around electrical outlets and switches can let air in through the outlet. Do you have an outlet or a switch that feels cold in the winter? This is probably what’s happening. But it’s an easy fix with these outlet sealers. All you have to do is remove the outlet or switch cover, press the sealer into position around the outlet or switch, and replace the cover. It’s that easy.
There you have it. In our second video on weatherizing your home, we’ll head down to the basement to show you some of the other problem areas to address that will help you increase your home’s energy efficiency.
Be sure to check out the other parts of this series:
Steps
- 1.

Walk the along the walls of your home outside and check for any openings where heat can escape.
- 2.
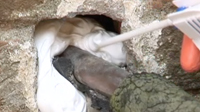
Fill the holes with expanding spray foam sealant. Wear rubber gloves and safety glasses for this step.
- 3.
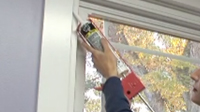
For Windows, looks for gaps in the wood surrounding the frame and glass. Check it on the inside of the as well as the inside. Use caulk to cover the gaps.
- 4.
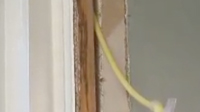
You can also take off the wooden frame of the window and add expanding foam sealant between the window inner frame and the wall.
- 5.

Seal gaps behind electrical fixtures if needed.
- 6.
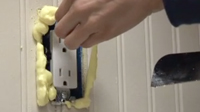
Once the foam has dried, trim away the excess foam.
- 7.
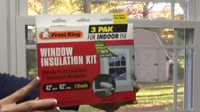
Add shrink film to your windows for extra insulation. Follow the manufacturer's instructions.
- 8.
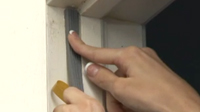
For doors, close the door and check for light passing through the edges. Use weather seal tape to close the gaps. Replace the threshold if needed.


Comments (0)